Frequently Asked Questions

General

Will insurance cover my smartCRUTCH ?

Maybe. However, you can use your HSA/FSA (Health Savings Account) debit card to pay for your crutches on www.smartcrutch-usa.com. 

smartCRUTCH does not bill insurance on your behalf; all products are shipped on receipt of payment in full. The good news is that in the past some customers have had their Health Insurance reimburse their purchase of smartCRUTCH. Individual insurance policies differ so vastly by medical necessity, provider, state and policy type that there is no one easy answer to this question. Some customers receive full or partial coverage, some are reimbursed the product cost and not shipping, and some are denied in full even with a prescription.

We are unable to guarantee the outcome of your reimbursement so if you are unsure; we suggest your first step is to contact your Insurance Provider ahead of time to confirm your policy inclusions and the process they need you to follow. We can provide you with a ‘sample’ receipt for the product you want so that your insurance company can assess the potential claim using the details on the receipt. Please email sales@smartcrutch-usa.com if you would like this sample PDF. Additionally, below you will find a general sample receipt link where you can also download a copy.

Please note that some Insurance providers will ask you to purchase smartCRUTCH through a DME (Durable Medical Equipment Supplier) or a measuring facility or orthotics company. At this time smartCRUTCH is not officially available through any other facility other than online at the webshop. That being said, we have seen that some DME’s have still purchased smartCRUTCH through the webshop on a customer’s behalf. The price you pay may differ to what you would purchase it directly through Smart Mobility Inc. We are able to drop ship directly to customers.

Once you have purchased your smartCRUTCH, we are unable to assist with insurance claims directly. However, on request, we will provide you with a separate detailed receipt to give you the best chance possible for success in your claim. If you are planning to claim your smartCRUTCH purchase from your insurance, here are some helpful suggestions for you to consider:

1.Some Insurance Providers request a completed HCFA CMS 1500 form from you with your claim. Your Medical Provider (physician, PT, OT, Orthopedic surgeon, referring medical practitioner) must fill out this form for you to attach to our receipt. We are not licensed to complete this form on your behalf. This form will include ICD-10 codes (disorders, injuries or conditions requiring you to use crutches). For smartCRUTCH there are literally thousands of ICD-10 codes that relate to reasons why patients would need to use crutches so we are not able to provide a limited list of these.

2. You need to request a detailed receipt at the time of placing your order with us (in the notes section of the checkout form). See a sample detailed receipt below that you could print and share with your insurance company prior to purchase.

3. It is helpful to obtain a diagnosis code from your physician for your particular ailment and supply this to us in the notes section or via email, so we can include it on the receipt.

4. Some Insurance Providers request a Prescription from your Medical Provider. We are not able to provide a prescription for you.

5. The following CMS HCPCS Codes (Healthcare Common Procedure Coding System) may be relevant to your purchase

  • E-0111   Crutch, forearm, includes crutches of various materials, adjustable or fixed, each, complete with tip and handgrip (single)
  • E-0110   Crutches, forearm, includes crutches of various materials, adjustable or fixed, pair, complete with tips and handgrips (pair)
  • E-0153   Platform attachment, forearm crutch, each
  • E-0100   Cane, includes canes of all materials, adjustable or fixed with tip

6. Some insurance forms ask for ‘a place of service’. This is the location where you will be using your crutches the most. This is usually ‘Home’ and is coded by the number ‘12’.

7. smartCRUTCH has the following relevant information that your insurance provider might require:

  • FEIN # 26-3769760 (Yeoman Technology Group, LLC is the parent company to smartCRUTCH-USA)
  • FDA Device Listing # D269388
  • National Provider Identifier (NPI) # 1992215743
  • DME Supplier License ID # 20176001225
  • SAM Cage Code 8W0K1
  • NAICS: 339113
  • DUNS: 017639490
  • Unique Entity ID:: JBV6HMH8X637

8. If you do have to file a claim yourself, don’t put it off!  Many plans limit the length of time after receiving products or services that you can file a claim.  Some time limits are as little as 30 days. The date of our receipt will be the date you paid for it.

9. Keep a photocopy of all the paperwork you supply to your Insurance Provider, and send them the originals.

10. Your Insurance Benefits Summary document should include instructions on how to file, along with copies of claim forms or details on how to obtain them (such as downloading them online).

11. The back of your insurance card will likely have a toll free telephone number for member services that you can call for assistance, as well.

Good luck!

https://smartcrutch-usa.com/pages/sample-receipt

Can I use smartCRUTCH® safely on all indoor surfaces and outdoors?

Yes, this is due to our replaceable rubber tips, the hour-glass shaped foot maximizes ground contact regardless of the leg position. The piece is made from rubber and is unique in design, allowing the rubber to angulate in all directions during the transfer to the ground, ensuring horizontal adherence on the non-skid flat tread to the ground at all times. This provides a far more secure hold than conventional crutch tips, adding to the increased feel of confidence the crutches give on various surfaces. 

We do sell tip covers with studs for use on ice or snow. These are seasonal items so please contact us if you don't see them available.

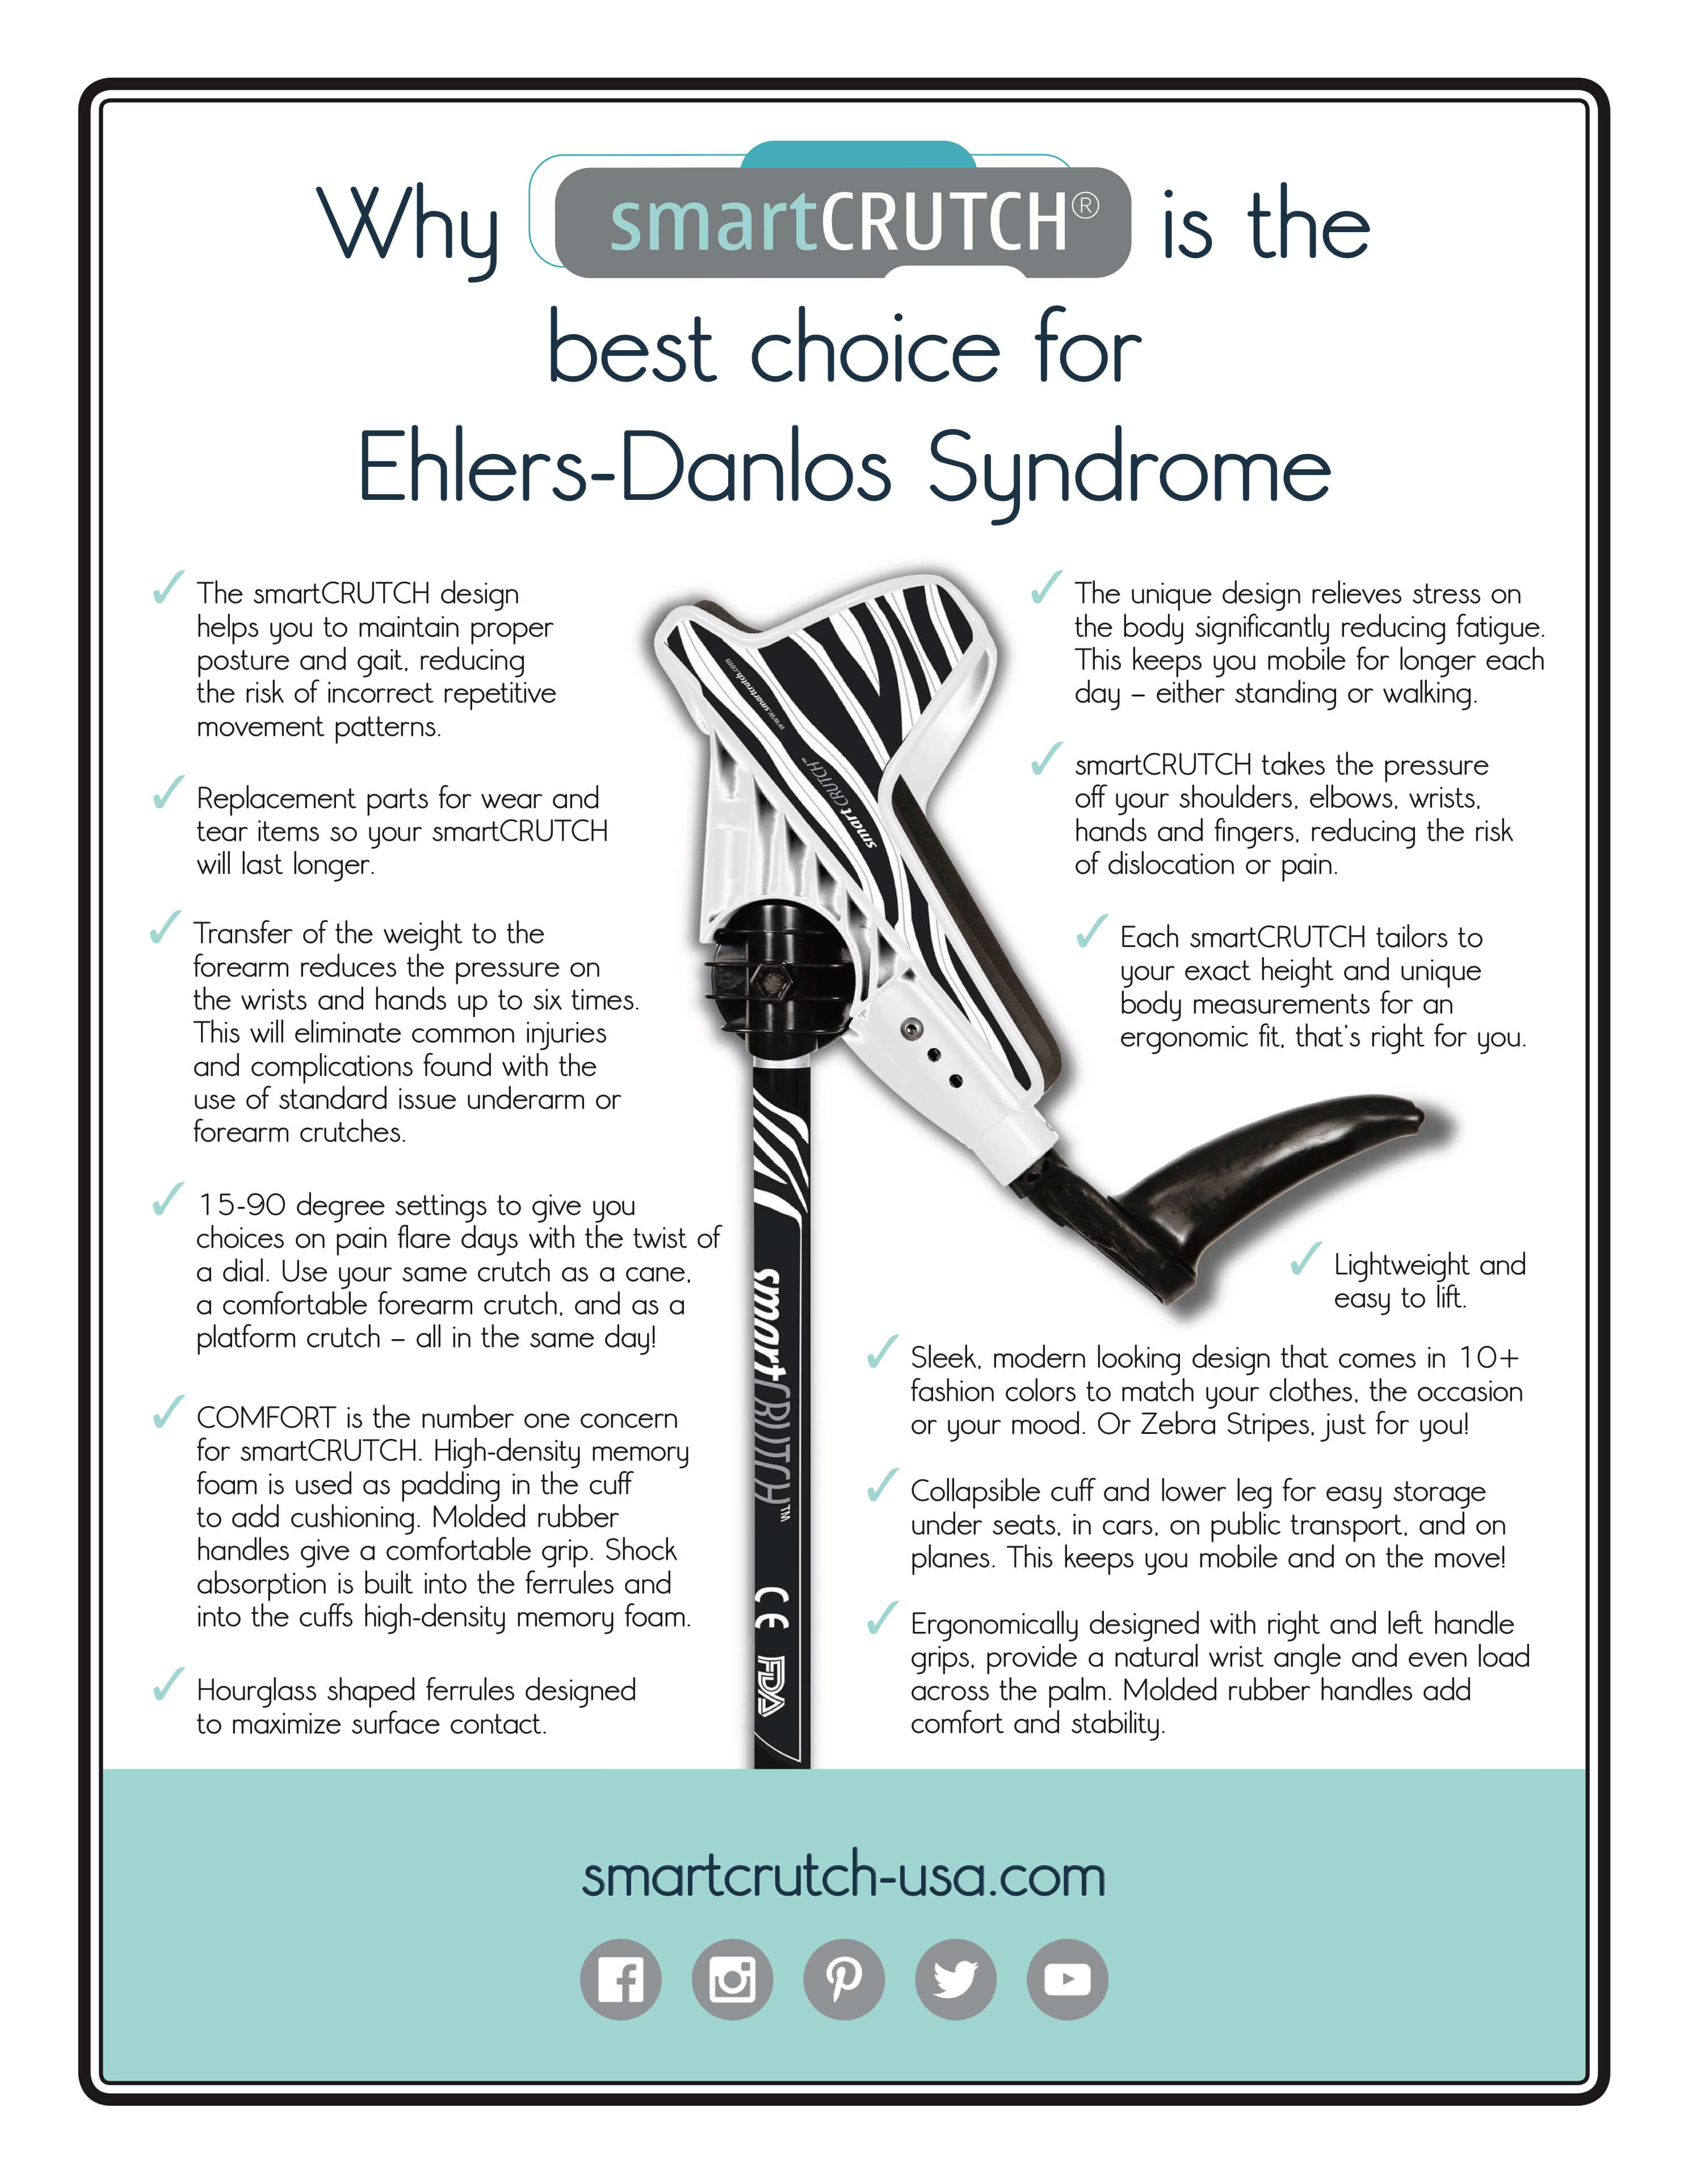
Why people with Ehlers-Danlos Syndrome (EDS) prefer smartCRUTCH®

Will smartCRUTCH® bear my weight?

Our smartCRUTCHes are guaranteed/warrantied to a maximum weight of 260LBS (120kgs). For safety reason we don’t recommend you purchase them if you are over that weight.

Can I use a single smartCRUTCH® or use one smartCRUTCH® instead of a cane?

Yes, many customers use smartCRUTCH™ very successfully either with a single right or single left crutch.

I cannot put any weight on my hand and/or wrist, is smartCRUTCH® a platform crutch?

Yes, they are fully adjustable from 15 to 90 degrees, so each individual crutch can be adjusted to whatever angle suits your body. When used as a platform they completely remove pressure from your hands and wrists.

I'm going from axillary crutches to smartCRUTCH® - are there differences in the way you walk with them?

Yes absolutely, there are differences between any other crutch and smartCRUTCH, and particularly if you came from axillary crutches these will take some getting used to.

Make sure you hold your elbows close to your sides, and you place the feet slightly more forward and outwards (about 45 degrees) than you would axillary crutches. You also use them higher than you think you should (just check you’re not bunching up your shoulders or neck).

Watch the video below for tips on how to set up and walk. Don’t worry it takes a little transition for your brain to understand it’s a new technique and after a short time, you won’t ever be able to use another crutch type ever again!

Read Tom's helpful review about his transition below the video.

Unique Design That Adjusts in Seconds


“Smart CRUTCHes, the most comfortable way to be crutchy!

I recently had surgery on my left foot which was going to leave me not able to put any weight on it for about 6 weeks. I had a similar surgery on my right foot almost 20 years ago while I was in the Army and outside of the pain from the surgery itself, the one thing that stuck out in my memory was how raw my armpits were after several weeks of crutching around. Very frustrating. Couldn’t walk and it hurt to use crutches. That’s why I was so intrigued when I came across these SmartCRUTCHES. Instead of all of my weight being distributed on my armpits, I was using the strength of my shoulders and arms to hold myself up. Right off the bat I noticed that these crutches were more comfortable under my arms, but they seemed very hard to balance on. The motion used with SmartCRUTCH is so much different than regular crutches. For the first 4 or 5 days I actually carried my regular crutches and my SmartCRUTCHES in my car with me as I wasn’t for sure which pair I preferred. By the end of the first week it had become clear. I had gotten used to the SmartCRUTCH and was easily able to move around with them. No more pain under my arms! I felt like it was somewhat more natural to use regular crutches as you get to lean all of your body weight on them and they are directly under you, but the thing that makes regular crutches more convenient is also the same thing that makes them painful. With the SmartCRUTCH, they are out in front of you instead of directly under you and you do have to use strength from your muscles to hold yourself up. I believe this is where the learning curve came in. But like I said, after the first week I would’ve never wanted to switch back.

Thanks SmartCRUTCH”

Tom, Colorado, USA

What Is Your Warranty?

We offer a one-year limited warranty to be free from manufacturing defects. The warranty does not extend to non-durable components, such as rubber accessories and grips, which are subject to normal wear and need periodic replacement.


If you are not completely satisfied with your smartCRUTCH, you can return it within 30 days.

I've received my smartCRUTCH® package, what should I do next to ensure the best experience possible?

Thank you for your order, we are so excited for you to receive your smartCRUTCH package.

Open it!!

We want you to have the best experience possible, and for this there are two things in our experience that would help you:

1. Set Up

Make sure your smartCRUTCHes are set up properly for you for maximum comfort and safety. There are instructions in the box, but it’s also worthwhile watching two of the videos below called "how to assemble smartCRUTCH' and 'Non weight bearing use'.

2. Transition

You can see from our amazing Reviews that smartCRUTCH changes lives.

However, it is a very different style of crutch use to what you have seen before and are used to (which is why it's pain-free and comfortable). Please expect it to feel a little awkward and counter-intuitive when you first try them. That’s absolutely normal. Many customers report they took between 20 minutes to a couple of hours transitioning from other forearm crutches or from axillary to smartCRUTCH, but after that time they didn’t look back. 

Think about when you lie down on the couch to watch TV, you're sideways and it's rather awkward to watch, but 15 minutes later, your brain has figured it out and you're seeing it the right way up. That's because it created a new neuro-pathway for that, and it will for smartCRUTCH too, and quickly.

Read Tom's helpful account of his transition here

The videos below are also helpful with this transition as they demonstrate walking with your smartCRUTCH.

Lastly, once you’ve got the hang of it (and you’re no longer in pain and whizzing around the place at top speed), please drop us a line and tell us all about it. We love reviews. They help other customers in the same situation as you to make this SMART leap.

Thanks!

Set Up Your smartCRUTCH Forearm Crutches

smartCRUTCH Demonstration for Non Weight Bearing Use


Is the rubber used in smartCRUTCH® is latex free?

If you have a latex allergy, you needn't worry as smartCRUTCH is latex free.

Is smartCRUTCH® suitable for non-weight bearing use?

Absolutely! It's a great choice for weight bearing or non-weight bearing.

Watch the video below for tips on how to set up and non-weight bearing use.

Don’t worry it takes a little transition for your brain to understand it’s a new technique and after a short time you won’t ever be able to use another crutch again!

smartCRUTCH Demonstration for Non Weight Bearing Use

Using smartCRUTCHes for the first time with EDS

Customers with EDS often tell us that when they began using smartCRUTCHES they went right to using them at 90 degrees. Prior to smartCRUTCHES many struggle (and frequently fall for that matter) using a cane. Using the cane often leaves users with a pretty bad case of carpal tunnel, so when you start using smartCRUTCHES you might not be able to bear much weight on your wrists. If your joints allow for it, while using the smartCRUTCHES we recommend that you occasionally change the angle of the cuff. When you change the angle of the cuff it allows you to apply pressure in different ways and change which joint you are putting the majority of your weight on. So when you get your smartCRUCTHES we would suggest trying to start at 90 degrees, but if that doesn’t feel comfortable for you then you can always start at more of an angle and slowly move up to 90.

Is the color on your website the exact color of the smartCRUTCH® I'll get?

We have taken photographs for the website of the exact smartCRUTCH® you’ll be receiving, however screen resolution isn’t always the same for every computer/phone so there could be a slight variation to what you can see on screen. If for any reason the stock batch we receive has a significant change in hue, we will always advise you.

What are the most popular smartCRUTCH colors sold?

You can check out the Color Range here. There are over 40 fashion colors to choose from, available on all smartCRUTCH models. Black hands down is the most popular smartCRUTCH color. After that for women: purple, grey and pink; and for men blue, grey and red in that order. That being said we do sell a lot of each color, that is just on percentage. Many customers buy a few different colors to match to their different activities, outfits or moods. They start with one color, and then add on as they go. One customer bought Yellow to match his Mini Cooper, another bought Orange to match his dirt bike (he was recovering from an injury after falling from it), another bought Green to support his NFL team, a young women bought pink to match the recent streaks she put in her hair.

Everyone’s different! That’s why we have so many colors and have added more colors and designs over the years!

What spares should I buy with my smartCRUTCH® and how quickly will my rubber crutch tips wear out?

However, if you are a permanent crutch user, the wear and tear of parts will depend on a) your weight b) how much indoor versus outdoor use there is c) how much weight bearing there is.

Many users never need to replace any parts including the crutch's rubber tips. However, for very hard-wearing users, the crutch rubber tips, foam pads in the cuff, and the handles (if the rubber wears down eventually) may need replacing over time. You can return to the website anytime and buy these spare accessories as you need them.

If you are concerned you can always buy some spare accessories with your initial purchase, and we include this in the standard shipping price.

You can read more about our Warranty and Replacement Terms here.

Sizing

Do you have a Cuff Sizing Chart

Yes! We do have a sizing chart that pre-dates our perfectFIT sizing tool. While it is still available by clicking below, if you use perfectFIT you will only need to make a couple of measurements rather than navigating the chart. Keep in mind that the key measurement is "forearm circumference". If you are on the cusp between SMALL and MEDIUM lean towards SMALL as you'll likely have plenty of wiggle room in your cuff even if you are a little bit over the 8 to 10.5" forearm circumference.

Sizing Chart

You may also find this video has some helpful tips on how to measure yourself.

Why do you offer smartCRUTCH® with extended and shortened legs and what size are they?

All of the smartCRUTCH models have an option for a shortened or an extended lower leg. Below are the height ranges that require a shortened or an extended lower leg:

  • Height range of 4'4" to 4'11" requires a shortened lower leg
  • Height range of 4'11' to 6'4" requires our default standard lower leg
  • Height range of 6'4" to 6'7" requires an extended lower leg

Is smartCRUTCH® adjustable enough that two people could share them?

We often get asked if two people in one family can share a pair of smartCRUTCHes, as they both need crutches from time to time, or perhaps they both have surgeries coming up.

It is possible because there is a fair adjustable range within each model and they can be moved back and forth to fit each person. The trick is to match not just your heights but also your forearm circumference and forearm length. Essentially you need to work out if you can both use the same cuff size (small, medium or large).

Also, if you have the same cuff sizing but one of you falls outside of the height range you can buy an extra pair of lower leg extensions (either longer or shorter than the standard that it comes with). See Spares in our shop.  Then you can exchange these as well, each time you swap users.

There is a helpful sizing chart here to see where you both fit and it includes instructions on how to measure yourselves.

You'll just have to agree on a color you both like!


How to choose smartCRUTCH® cuff size

Using our perfectFIT custom sizing tool is the simplest way to determine cuff size. Just a couple of measurements and we will do the rest to ensure a perfect fit!

You can also use our crutch sizing chart here - https://smartcrutch-usa.com/selecting-your-smartcrutch-size/ or see the video (currently under construction) on choosing a cuff size below.

If you need us to help determine what crutch size you need, please provide us with your height, your forearm circumference at the widest part of the forearm, and your inner forearm length, measured from the crease of your wrist to the fold of your elbow, with your elbow bent at a 90° angle. You can email this to support@smartcrutch-usa.com


How to choose smartCRUTCH® cuff size


I am 6’4" (193 cms) will your standard smartCRUTCH® model fit me?

We recommend that you choose the cuff size (small, medium or large) with an extended lower leg which will allow for height range from 6'4" to 6'7". So the extended leg would be for you! You just select your correct cuff size with the extended leg in the order drop down and you will be sent a pair with the longer legs automatically.

See our crutch sizing chart here - https://smartcrutch-usa.com/selecting-your-smartcrutch-size/ 

I am 4'8" (142 cms), will your small smartCRUTCH® fit me?

The small smartCRUTCH® cuff comfortably fits a height range of 4’4 inches all the way up to 6’7″ and a forearm circumference range of 8-10 inches.

See our crutch sizing chart here – Selecting your Smartcrutch Size

What if my small cuff is still too large?

How about creating a second layer of padding? Imagine if the padding on your cuff were twice as thick. If you think this would do the trick, you can install a second padding layer.

Buy A Second Layer of Padding on www.smartCRUTCH-USA.com at https://smartcrutch-usa.com/products/smartcrutch-wing-tip-pads 

Install a Second Layer of Padding

1) place the 2nd layer of the base pad first

2) before removing the adhesive backing, check the fit of the wing cuff pads with backing paper still on so it isn't sticky yet

3) trim the wing cuff pad as needed with scissors along the straight edge, likely 1/4 inch-ish

4) remove the wing cuff backing to expose the adhesive and place it accordingly

Another Option... Get Creative with DIY Options

We've had customers get creative and purchase different adhesive-backed synthetic sheepskin or lambskin from JoAnn or Michaels and cut it to the needed size with scissors. You likely need to purchase some double-sided adhesive backing for the synthetic sheepskin. See the links below and get creative to make your crutches as comfy as possible. You can also purchase adhesive-backed foam that is thinner or thicker than our default 1/4"... you could go with 1/16" if you want it to be thinner or go right to 1/2" if you want a single layer that is twice as thick. These are all alternative options to consider.

Amazon 1/4" Adhesive-Backed Foam: https://www.amazon.com/Dualplex-Neoprene-Adhesive-Perfect-Cosplay/dp/B07WVRQ59Q/ref=sr_1_9?crid=3RSUBT19SSV40&keywords=adhesive%2Bbacked%2Bfoam%2B1%2F4&qid=1691675330&sprefix=adhesive%2Bbacked%2Bfoam%2B1%2F4%2B%2Caps%2C105&sr=8-9&th=1

Amazon Synthetic Lambskin Padding: https://www.amazon.com/Essential-Medical-Supply-Sheepette-Synthetic/dp/B001CBG14U/ref=sr_1_7?crid=2JT5QZJNWR5JC&keywords=sheepskin%2Bpadding%2Bfor%2Bpatients&qid=1691675967&sprefix=sheepskin%2Bpadding%2Caps%2C127&sr=8-7&th=1

Amazon 3M Adhesive Transfer Tape 467MP 200MP - Double Linered 7952MP Clear - 12in x 8in: https://www.amazon.com/Adhesive-Transfer-Tape-467MP-200MP/dp/B074L5LSSZ/ref=sr_1_3?crid=1KBN1NZT41NXC&keywords=3m+200mp+adhesive&qid=1691676240&sprefix=3M+200MP+adhesive%2Caps%2C110&sr=8-3

We hope this helps! Move freely.

How do I know whether the small, medium or large cuff is the right size for me?

Every person’s body is slightly different – as is the way that they use smartCRUTCH (or any crutch). Generally the cuff size determines which crutch you would choose. We have a shortened lower legs if you are 4’11 or shorter and we have extended lower legs if you are 6’4″ or taller. However, we find the easiest way to ensure the correct sizing is to ask you for your specific measurements and let the ordering system do the work for you. You will need to measure your forearm circumference (measured around the largest part of your forearm) as well as the length of your forearm from the inside of your elbow crease to the inside of your wrist crease. See our crutch sizing chart here – Selecting your Smartcrutch Size If you’ve been through this already and are still unsure we would be happy to help you, email us through our Contact Us form or call 800-930-5928 between 9am and 5pm EST Monday to Friday.

I'm confused by the various measurement conversions, do you have a table of this to view?

See our crutch sizing chart here – Selecting your Smartcrutch Size

Shipping and Returns

What is your shipping policy?

Please visit our Shipping Policy page

Do you ship outside of the U.S. and Canada?

Yes, we offer the ability to ship anywhere in the world (other than countries banned by the US) through GlobalShopex, our global shipping partner. You will seamlessly be allowed to choose locations other than the US and Canada during checkout using the "International Checkout" button.

We look forward to serving our passionate customers around the globe!

For more information on shipping, click Shipping.

What is your return/refund policy?

You may view our return policy here

Cuff Exchange - How to order an exchange and swap cuffs

Ordering a Cuff Exchange: 

We can definitely do a cuff exchange for you! We charge $15 to $30 for exchanges to cover our shipping and processing cost based on your address. We can create an online invoice for you payable online. Once the invoice is paid, we will send you the new set of cuffs and include a pre-paid return shipping label. 


Exchanging Out Your Old Cuff 

To exchange your old cuffs for the new ones, first completely unscrew the black angle adjustment wingnut and remove the old cuff from the leg assembly. Please note that we’ve marked the grips on the new cuffs as either “left” or “right”. Then reattach the new “left” cuff to the “left” leg and tighten down the black angle adjustment wingnut. Repeat for the right cuff. The old cuffs then go back in the box. Apply the included return shipping label over top of the original shipping label. Then just ship the box back to us.

If you have any questions please reach out!

Leg Exchange - Swap old legs to new ones

To exchange your old legs for the new ones, first completely unscrew the black angle adjustment wingnut and remove the cuff from the old leg assembly. The new legs are already marked as either “left” or “right”, but your old handles aren't. So make sure to note which cuff is your left cuff and which cuff is your right cuff (When the crutches are assembled the handles should point inwards). Then reattach the new “left” leg to the “left” cuff and tighten down the black angle adjustment wingnut. Repeat for the right leg. The old legs then go back in the box. Apply the included return shipping label over top of the original shipping label. Then just ship the box back to us.

How to Print Return Labels Without a Printer

There are many ways to print your return packing slip when you need a printer. A friend, the Senior Center, local school, library, grocery store, Walgreens, Rite-Aid, UPS Store, Staples, etc. See the articles below to learn the best option for you.

https://www.theverge.com/22737500/print-document-how-to-laser-inkjet

https://www.technewstoday.com/how-to-print-without-a-printer/

Package Didn't Arrive or Package Stolen

STEP #1

  • Use your tracking # to ensure your package is not delayed or misplaced. Oftentimes packages are placed in a new location or even delivered to a neighbor... it happens. Please check all entrances to your home or apartment, check with the front desk of your building, and check with neighbors.

STEP #2 - File a Police Report by Calling or Online

  • If your package did not arrive, we require you to file a police report before working with you on refunding or replacing your order.
  • Filing a report will let the police know that package theft is a problem in your area, making it more likely that the police can catch the current offender and prevent future theft.
  • Find the non-emergency number for your local police department. Of course, the exact number will vary depending on where you live, but you should be able to find it quickly enough through a simple Google search.
  • Many police departments provide ways to file a police report online conveniently. The individual URL will again vary depending on your location, a Google search of your town/city plus “online police report” will turn up the place to report your stolen package. Select the type of crime that has occurred and provide details, including all information about the theft, and stick to the facts, as filing a false report is a crime.

STEP #3

  • Provide a copy of your police report to support@smartcrutch-usa.com, and we will proceed with the next steps on your refund or replacement

UPS Shows My Package as Delivered But I Cannot Find It

UPS normally does a great job delivering our products, however there are cases of course where they confirm delivery and the item was actually received by a neighbor or placed in an area where customers don't normally look.

The first step is to check with neighbors and check any new or different places where the package might have been delivered. The next step would be for you to reach out to UPS to place a claim if UPS has confirmed delivery. You can place a claim at https://www.ups.com/us/en/support/file-a-claim.page? Once your UPS claim with supporting documentation has been issued, processing takes on average 8-15 business days. Claims that have been approved and payment paperwork has been provided, processing generally takes between 3-5 days.

Additionally, you may contact UPS customer support at 800-742-5877

Insurance

Will insurance cover my smartCRUTCH?

Maybe. However, you can use your HSA/FSA (Health Savings Account) debit card to pay for your crutches on www.smartcrutch-usa.com. 

smartCRUTCH does not bill insurance on your behalf; all products are shipped on receipt of payment in full. The good news is that in the past some customers have had their Health Insurance reimburse their purchase of smartCRUTCH. Individual insurance policies differ so vastly by medical necessity, provider, state and policy type that there is no one easy answer to this question. Some customers receive full or partial coverage, some are reimbursed the product cost and not shipping, and some are denied in full even with a prescription.

We are unable to guarantee the outcome of your reimbursement so if you are unsure; we suggest your first step is to contact your Insurance Provider ahead of time to confirm your policy inclusions and the process they need you to follow. We can provide you with a ‘sample’ receipt for the product you want so that your insurance company can assess the potential claim using the details on the receipt. Please email sales@smartcrutch-usa.com if you would like this sample PDF. Additionally, below you will find a general sample receipt link where you can also download a copy.

Please note that some Insurance providers will ask you to purchase smartCRUTCH through a DME (Durable Medical Equipment Supplier) or a measuring facility or orthotics company. At this time smartCRUTCH is not officially available through any other facility other than online at the webshop. That being said, we have seen that some DME’s have still purchased smartCRUTCH through the webshop on a customer’s behalf. The price you pay may differ to what you would purchase it directly through Smart Mobility Inc. We are able to drop ship directly to customers.

Once you have purchased your smartCRUTCH, we are unable to assist with insurance claims directly. However, on request, we will provide you with a separate detailed receipt to give you the best chance possible for success in your claim. If you are planning to claim your smartCRUTCH purchase from your insurance, here are some helpful suggestions for you to consider:

1.Some Insurance Providers request a completed HCFA CMS 1500 form from you with your claim. Your Medical Provider (physician, PT, OT, Orthopedic surgeon, referring medical practitioner) must fill out this form for you to attach to our receipt. We are not licensed to complete this form on your behalf. This form will include ICD-10 codes (disorders, injuries or conditions requiring you to use crutches). For smartCRUTCH there are literally thousands of ICD-10 codes that relate to reasons why patients would need to use crutches so we are not able to provide a limited list of these.

2. You need to request a detailed receipt at the time of placing your order with us (in the notes section of the checkout form). See a sample detailed receipt below that you could print and share with your insurance company prior to purchase.

3. It is helpful to obtain a diagnosis code from your physician for your particular ailment and supply this to us in the notes section or via email, so we can include it on the receipt.

4. Some Insurance Providers request a Prescription from your Medical Provider. We are not able to provide a prescription for you.

5. The following CMS HCPCS Codes (Healthcare Common Procedure Coding System) may be relevant to your purchase

  • E-0111   Crutch, forearm, includes crutches of various materials, adjustable or fixed, each, complete with tip and handgrip (single)
  • E-0110   Crutches, forearm, includes crutches of various materials, adjustable or fixed, pair, complete with tips and handgrips (pair)
  • E-0153   Platform attachment, forearm crutch, each
  • E-0100   Cane, includes canes of all materials, adjustable or fixed with tip

6. Some insurance forms ask for ‘a place of service’. This is the location where you will be using your crutches the most. This is usually ‘Home’ and is coded by the number ‘12’.

7. smartCRUTCH has the following relevant information that your insurance provider might require:

  • FEIN # 26-3769760 (Yeoman Technology Group, LLC is the parent company to smartCRUTCH-USA)
  • FDA Device Listing # D269388
  • National Provider Identifier (NPI) # 1992215743
  • DME Supplier License ID # 20176001225
  • SAM Cage Code 8W0K1
  • NAICS: 339113
  • DUNS: 017639490
  • Unique Entity ID:: JBV6HMH8X637

8. If you do have to file a claim yourself, don’t put it off!  Many plans limit the length of time after receiving products or services that you can file a claim.  Some time limits are as little as 30 days. The date of our receipt will be the date you paid for it.

9. Keep a photocopy of all the paperwork you supply to your Insurance Provider, and send them the originals.

10. Your Insurance Benefits Summary document should include instructions on how to file, along with copies of claim forms or details on how to obtain them (such as downloading them online).

11. The back of your insurance card will likely have a toll free telephone number for member services that you can call for assistance, as well.

Good luck!

https://smartcrutch-usa.com/pages/sample-receipt

Buying

Will my insurance cover smartCRUTCH®?

Maybe. However, you can use your HSA/FSA (Health Savings Account) debit card to pay for your crutches on www.smartcrutch-usa.com. 

smartCRUTCH does not bill insurance on your behalf; all products are shipped on receipt of payment in full. The good news is that in the past some customers have had their Health Insurance reimburse their purchase of smartCRUTCH. Individual insurance policies differ so vastly by medical necessity, provider, state and policy type that there is no one easy answer to this question. Some customers receive full or partial coverage, some are reimbursed the product cost and not shipping, and some are denied in full even with a prescription.

We are unable to guarantee the outcome of your reimbursement so if you are unsure; we suggest your first step is to contact your Insurance Provider ahead of time to confirm your policy inclusions and the process they need you to follow. We can provide you with a ‘sample’ receipt for the product you want so that your insurance company can assess the potential claim using the details on the receipt. Please email sales@smartcrutch-usa.com if you would like this sample PDF. Additionally, below you will find a general sample receipt link where you can also download a copy.

Please note that some Insurance providers will ask you to purchase smartCRUTCH through a DME (Durable Medical Equipment Supplier) or a measuring facility or orthotics company. At this time smartCRUTCH is not officially available through any other facility other than online at the webshop. That being said, we have seen that some DME’s have still purchased smartCRUTCH through the webshop on a customer’s behalf. The price you pay may differ to what you would purchase it directly through Smart Mobility Inc. We are able to drop ship directly to customers.

Once you have purchased your smartCRUTCH, we are unable to assist with insurance claims directly. However, on request, we will provide you with a separate detailed receipt to give you the best chance possible for success in your claim. If you are planning to claim your smartCRUTCH purchase from your insurance, here are some helpful suggestions for you to consider:

1.Some Insurance Providers request a completed HCFA CMS 1500 form from you with your claim. Your Medical Provider (physician, PT, OT, Orthopedic surgeon, referring medical practitioner) must fill out this form for you to attach to our receipt. We are not licensed to complete this form on your behalf. This form will include ICD-10 codes (disorders, injuries or conditions requiring you to use crutches). For smartCRUTCH there are literally thousands of ICD-10 codes that relate to reasons why patients would need to use crutches so we are not able to provide a limited list of these.

2. You need to request a detailed receipt at the time of placing your order with us (in the notes section of the checkout form). See a sample detailed receipt below that you could print and share with your insurance company prior to purchase.

3. It is helpful to obtain a diagnosis code from your physician for your particular ailment and supply this to us in the notes section or via email, so we can include it on the receipt.

4. Some Insurance Providers request a Prescription from your Medical Provider. We are not able to provide a prescription for you.

5. The following CMS HCPCS Codes (Healthcare Common Procedure Coding System) may be relevant to your purchase

  • E-0111   Crutch, forearm, includes crutches of various materials, adjustable or fixed, each, complete with tip and handgrip (single)
  • E-0110   Crutches, forearm, includes crutches of various materials, adjustable or fixed, pair, complete with tips and handgrips (pair)
  • E-0153   Platform attachment, forearm crutch, each
  • E-0100   Cane, includes canes of all materials, adjustable or fixed with tip

6. Some insurance forms ask for ‘a place of service’. This is the location where you will be using your crutches the most. This is usually ‘Home’ and is coded by the number ‘12’.

7. smartCRUTCH has the following relevant information that your insurance provider might require:

  • FEIN # 26-3769760 (Yeoman Technology Group, LLC is the parent company to smartCRUTCH-USA)
  • FDA Device Listing # D269388
  • National Provider Identifier (NPI) # 1992215743
  • DME Supplier License ID # 20176001225
  • SAM Cage Code 8W0K1
  • NAICS: 339113
  • DUNS: 017639490
  • Unique Entity ID:: JBV6HMH8X637

8. If you do have to file a claim yourself, don’t put it off!  Many plans limit the length of time after receiving products or services that you can file a claim.  Some time limits are as little as 30 days. The date of our receipt will be the date you paid for it.

9. Keep a photocopy of all the paperwork you supply to your Insurance Provider, and send them the originals.

10. Your Insurance Benefits Summary document should include instructions on how to file, along with copies of claim forms or details on how to obtain them (such as downloading them online).

11. The back of your insurance card will likely have a toll free telephone number for member services that you can call for assistance, as well.

Good luck!

https://smartcrutch-usa.com/pages/sample-receipt

Where can I buy or try smartCRUTCH®?

At this time the only way anyone is able to purchase smartCRUTCH® products in the USA or Canada is directly from us on our online store, www.smartcrutch-usa.com or at www.amazon.com/smartcrutch

Some DME’s (Durable Medical Equipment Suppliers) will purchase smartCRUTCH® on your behalf, and these can be shipped to the DME for you to collect or shipped directly to you. As we currently do not offer Dealer prices some dealers will not be willing to purchase these on your behalf or alternatively they will charge you a mark-up for their involvement. However, in this instance, they are often able to bill your insurance, and that is helpful!

As we realize smartCRUTCH® is a tailored fit, and it would be nice to try them before deciding to keep them, we have created a fair refund and returns policy. It will cost the shipping, but we refund the product charges.

Some physical therapists and clinicians do have demo pairs which many of them have purchased, so we don’t unfortunately have a list of these. However, if your physician has a case for many patients requiring crutch use, ask them to contact us, and we will send them a demo pair if we have one available.

Can I buy on SAM government directory site

Yes, smartCRUTCH is listed in the SAM directory site. Here are our SAM details.

  • SAM Cage Code 8W0K1
  • NAICS: 339113
  • DUNS: 017639490
  • Unique Entity ID:: JBV6HMH8X637

What spares should I buy with my smartCRUTCH® and how quickly will my rubber crutch tips wear out?

However, if you are a permanent crutch user, the wear and tear of parts will depend on a) your weight b) how much indoor versus outdoor use there is c) how much weight bearing there is.

Many users never need to replace any parts including the crutch's rubber tips. However, for very hard-wearing users, the crutch rubber tips, foam pads in the cuff, and the handles (if the rubber wears down eventually) may need replacing over time. You can return to the website anytime and buy these spare accessories as you need them.

If you are concerned you can always buy some spare accessories with your initial purchase, and we include this in the standard shipping price.

You can read more about our Warranty and Replacement Terms here.

I would prefer to pay for my smartCRUTCH® a different way then through your webshop?

If you have an alternative method of payment we will try our very best to accommodate you. Email us through our Contact Us form or call or text 800-930-5928 between 9am and 5pm EST Monday to Friday.

Health Savings Account (HSA) FSA - using Debit Card

HSA/FSA - Health Savings Account (HSA)

To purchase a set of crutches using your FSA/HSA card you can use this payment link and order via a program we use called SquareUp.

https://checkout.square.site/merchant/04HQRP3P3KV6E/checkout/UH5UJJSK7S2HLGYSW6NCKELL 

How To

How To Remove Rubber Tips

HOW TO REMOVE RUBBER TIPS

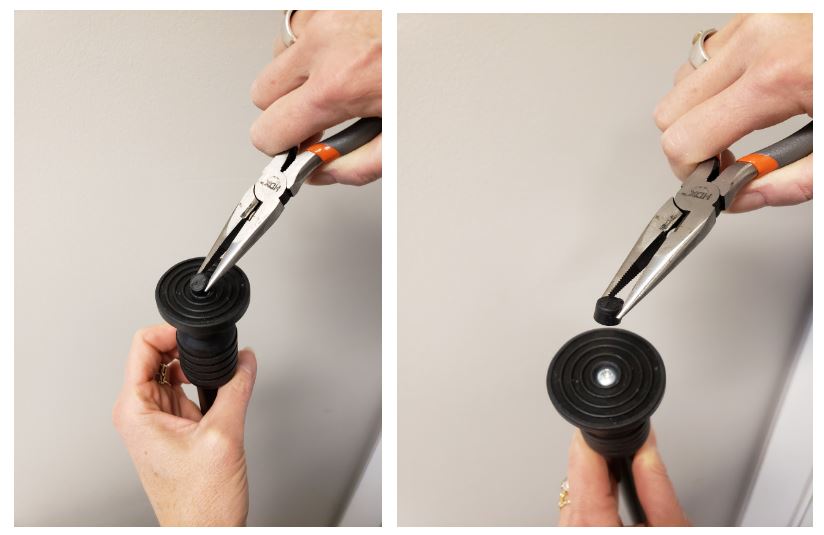
1) Use needle-nosed pliers or similar to remove the round rubber plug in the middle, and use a screwdriver to remove the self-tapping screw from the middle of the rubber tip

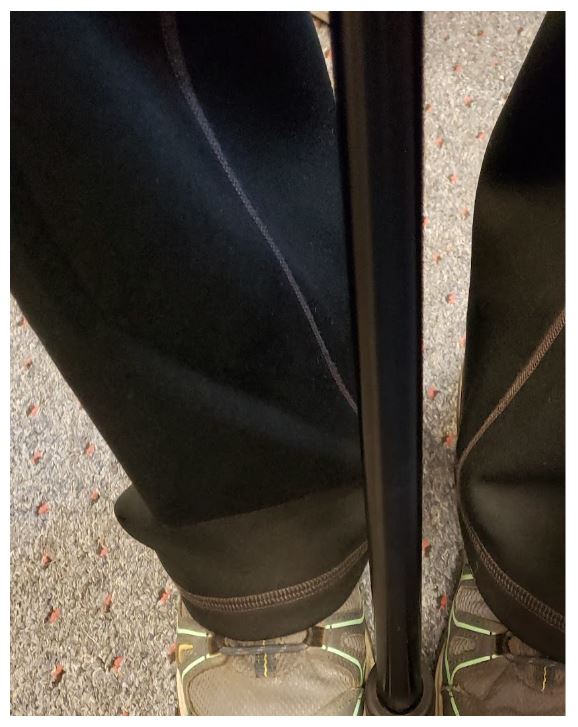
2) Wedge the rubber tip between your feet and wiggle it free

HOW TO PUT ON NEW RUBBER TIPS

1) Flip the crutch upside down and wedge the cuff between your feet

2) Remove the small plastic end cap that is located in the end of the leg nearest the rubber tip. The plastic end cap should only be used with our standard rubber tips.

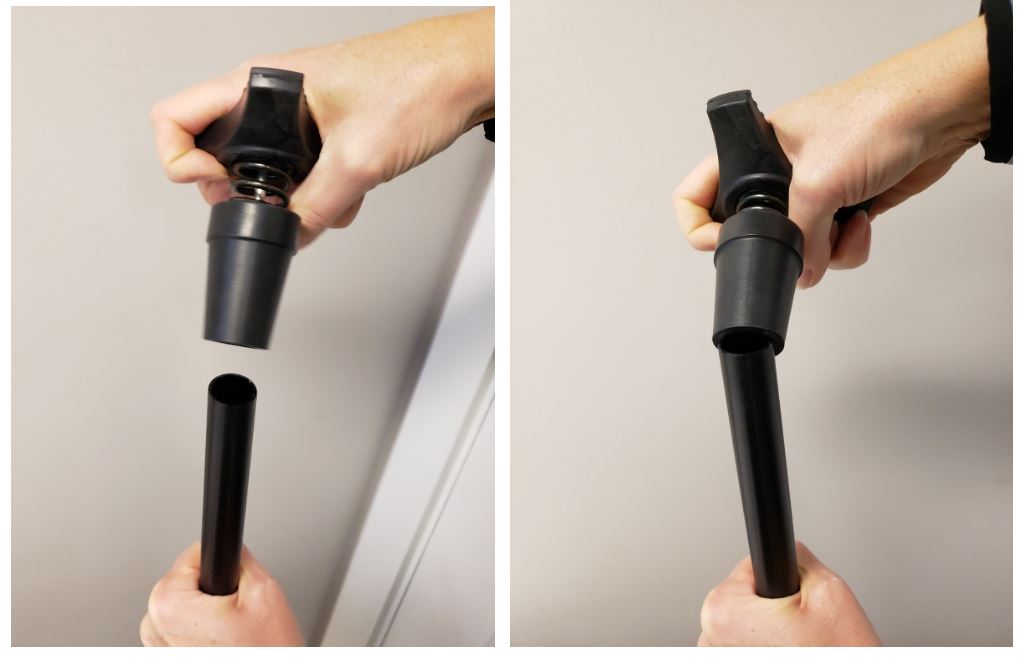
3) Angle the rubber tip so one edge of the crutch pole is in the opening

4) Wiggle and leverage the rubber tip back and forth until it is securely on 

How To Apply 3M Adhesive Strips to Wing Cuff Pads

Find a work space: Any flat surface where you can stabilize your smartCRUTCH will work. Your lap could work, but it's not ideal nor recommended.

Clean your hands: Even though any bubbles formed during application can be squeezed out, dirt/hair/other particles cannot. The cleaner your hands, the better.

Application: peel off both the wing cuff pads and adhesive strips from the paper. Match up the right adhesive strip to the right wing cuff pad, and apply the sticky side of the adhesive strip to the sticky side of the wing cuff pad. Make sure to apply pressure to ensure they will stick together. Once you feel as though the adhesive strip is attached well to the pad, pull off one corner of the adhesive strip. As you pull off the adhesive strip paper this will transfer the adhesive sticker to the wing cuff pad. Now you are ready to apply the wing cuff pad to your crutch!

How to Swap Grip Handles

To swap the handles, all you need to do is unscrew the handle adjustment bolt all the way until it is able to be removed completely. Then, just pull the handle out of its socket. At the bottom of the handle socket you will see two grooves. If you are looking directly into the socket, the notch on the bottom of the right handle will go into the left groove. After that, all you need to do is reinsert the bolt and set the handle to your desired length

Based on the date you ordered your crutches, there may be a “C-Clip” that prevents you from completely removing the handle adjustment bolt. If you are unable to completely unscrew/remove the handle adjustment bolt, you will need to remove the “C-Clip”. To access to c-clip remove the black cap coving the nut side on the left side of both crutch cuffs.

After the cap is removed, the c-clip can be removed with needle-nosed pliers. Once the c-clip it has been removed, unscrew the handle adjustment screw all the way. Then remove the handle and insert the new handle. After the new handle has been inserted you can screw in the handle adjustment screw. The c-clip does not need to be reinstalled so you can discard it.

Please let us know if you have any questions.

How do I switch the smartCRUTCH® handles to a different crutch?

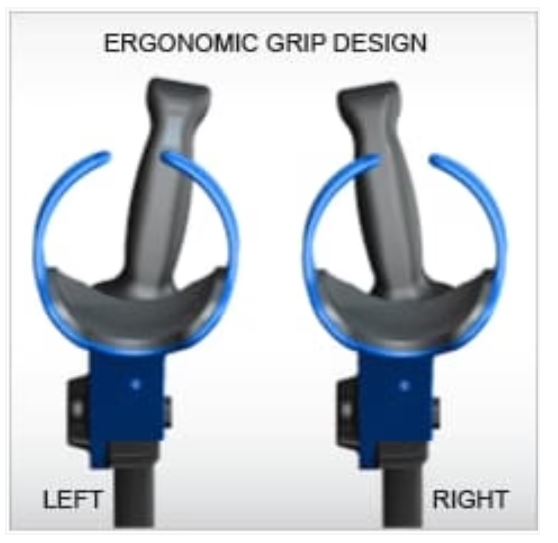
smartCRUTCH® handles can be used for left or right crutches and are interchangeable. There are only two positions for each crutch – left or right. You should always use the handle angled correctly for that hand for maximum comfort.
Here are the steps to change the angle of the handle.
1. Remove the wingnut and two washers (pay attention to the order they go on as you will need to put it back in the exact order otherwise it could dig into the plastic).
2. With a hammer gently knock the screw out.
3. Twist the handle to the opposite angle (it has two grooves, one for left, one for right).
4. Replace the screw using the hammer again, and replace the wing nuts and washers in the same order.
smartCRUTCH FAQ’s

How do I safely change the smartCRUTCH® lower legs?

Please follow the following steps to ensure that your lower legs are inserted easily.

If you don't follow these instructions you could: pop the plastic stopper off the top of the lower leg, scratch the legs or end up with two plastic spacers.

1. Remove the current extension gently by pulling it straight down slowly, until you're in line with the bottom hole.

2. Ideally you want to keep the plastic spacer with the lower leg, however check first to see if the spacers are too firmly adhered to the upper leg.

2a. If they are check to see if the lower leg extensions came with spacers and remove the extra spacers from the lower leg extensions, otherwise you will have two.

3a. Carefully remove the extension, making sure the plastic stopper is still in the top of the extension you are removing.

*********

2b. If the spacer on the top leg is moveable, keep the plastic spacer on the lower part of the leg so that it ‘pops off’ with the bottom piece. Keep the spacer below the button at all times. Make sure the plastic stopper is still secure in the top of the lower leg.

3b. Check your new extension has the spacer still on the leg. Keep the plastic black spacer on the new lower leg well below the button (push it down past the button). Make sure the plastic stopper is securely in the top of the leg before starting to insert it.

*********

4. Insert the new extension carefully - straight and slowly with the button on the opposite side to the holes until you have the plastic slider pushed back over the edge.

5. Move the button round by swiveling the leg until you can place it in the hole you want and pop it out through the hole.

Tah-dah!

Push Button Disappeared - How to put back in place?

If it looks like the adjustment button has just slipped out of place. To pop it back into place you will need a flashlight, a Philips head screwdriver, and a paperclip.

First, unscrew the black plastic cuff that is at the bottom of the crutch upper leg section. Once that is unscrewed you can remove the lower leg section from the crutch. The top of the lower crutch section should have a black plug with a screw in it (don't worry if the plug is missing, it can get stuck in the top of the upper crutch leg). Use the screwdriver to unscrew the screw that is in the plug, then remove the plug. Next, use your flashlight to visualize the push button inside the crutch leg. Then take your paper clip, straighten it out and bend the end into either a small hook (if the push button needs to be pulled up) or an L shape (if the push button needs to be pushed down). Use the hook to pull the push button into place or use the flat bottom of the L to push the push button into place.

Once the push button is in place you can put the black plug back on the top of the lower leg section and tighten it using the screwdriver. If the black plug wasn't in the top of the lower crutch leg when you removed it all you need to do is insert the lower crutch leg into the upper crutch leg, push it all the way up to the very top, stand the crutch up, and push down from the top. Then pull the lower crutch leg all the way back out. The black plug should be in place now, so all you need to do is tighten the screw. Then the lower crutch leg goes back into the upper crutch leg, and the black plastic cuff that was removed in the beginning is screwed back onto the bottom of the upper leg section.

Skin or Decal - Application Instructions

1. Find a work space! Any flat surface where you can stabilize your smartCRUTCH will work. Your lap could work, but it's not ideal nor recommended.

2. Clean your hands! Even though any bubbles formed during application can be squeezed out, dirt/hair/other particles cannot. The cleaner your hands, the better.

3. Clean your smartCRUTCH! Use a damp towel or damp paper towel to wipe down the surfaces you will be applying to. Again, the cleaner, the better. If you have an old decal that is quite bumpy or dinged up certainly remove it along with the residue if needed. If the old decal is smooth you can apply the new skin on top. You’ll have to use your own judgement or call us to discuss.

4. Dry, dry, dry! Using a dry and non-shedding towel, dry up any moisture left on the smartCRUTCH. Wait a few minutes to make sure that all water has evaporated. This is key. If your smartCRUTCH is wet, the skin will be much harder to apply, and the adhesive may not activate properly.

5. Right vs Left Side of Cuff - when you look down at your cuff with your forearm in it notice that the right side of the cuff has a thicker area. The skins are notated such that the narrower one is for the left side of the cuff as you look down and the thicker one is for the right side of the cuff.

6. Peel it off! Simply grab a corner of the vinyl skin and gently peel the backing away. Be sure to lift carefully to avoid any stretching of the vinyl.

7. Line it up! In this step we are not applying any pressure, our goal is to float the skin into place. Ok, so start your placement of the skin at the very very end of the wing, right by where there is the gap between wings... the wings are the parts that wrap up and over your forearm. Do not apply hard pressure, the skin will "float", and the skin will be able to lift up and reposition until you get it right. The skin will be able to slide or float on the surface. Without pressing down, gently allow/guide the skin to fall upon the cuff working up towards the main cuff area. Still don't press down. Gently allow/guide the skin to fall upon the cuff towards one side and then the other. Make sure you are not overlapping the edge of the cuff. If you are, simply peel the skin off and try again... you'll get it, no rush as the skin is meant to reposition over and over until it lines up the way that you want. Once it is lined up you can go to the next step to apply the pressure.

8. Stick it on! Now that everything is perfectly aligned, start applying pressure from the center and work your way out towards the edge of the smartCRUTCH. You'll want to fan out towards the edges to smooth out those bumps and any air.

9. Hairdryer! This just became your new best friend. For any surfaces or edges with curvature, do not put pressure right away. Heat the vinyl up with the hairdryer until it is soft, then apply pressure and watch the magic happen. This is key in creating smooth edges, so go slowly. Take your time.(Wait! What if I don't own a hairdryer?) If you don't own a hairdryer, fear not! There is an alternative. It may not work 100% as well as the above, but it should smooth out wrinkles quite satisfactorily. Here's what you should do. Spot the wrinkles, especially on curved edges. Take a cloth such as your shirt, a microfiber cloth, or any piece of cloth, really. Put pressure on the wrinkled area and rub vigorously. What this does is it creates friction, and thus heat (just like the hairdryer), which then makes the vinyl more pliable and more likely to smooth out. Continue to polish the area, inspect, and repeat as necessary.

10. Bye bye bubbles! If there are any bubbles, all you have to do is run your finger over them and guide them to the edge.

11. Enjoy! Show it off! Tag us on our Instagram @smartcrutchusa and we just may repost it! And of course, let us know if you have any questions, comments or concerns. We will always be here to make sure you are completely satisfied!


How To Install smartCRUTCH Gecko

...coming soon.